Calling C++ from Swift
Dec 6, 2016
When I was recently working on azul, a CityGML viewer for Mac, my first thought was to make a pure Swift 3 project. But alas, I soon found out that Apple’s XmlParser is awfully slow. Compared to val3dity, the first working version of the viewer was at least 10x slower in parsing XML.
The solution to this problem was pretty simple: using pugixml as an XML parsing backend instead1. However, pugixml is written in C++ and so it cannot be called directly from Swift. In my field of GIS research this is actually a very typical problem since most useful libraries are written in C/C++ (e.g. Boost, CGAL, GDAL, GEOS). Considering the relatively short time Swift has been out and its admittedly limited appeal, I suspect this is the case for a lot of people.
So, how do you call C++ code from Swift 3? There are different ways to do it, but in my opinion the best involves an Objective-C++ double wrapper with a pure Objective-C header.
A double wrapper
I will use examples directly taken from azul. So, assuming you have a C++ class CityGMLParser, you simply need to create an Objective-C header CityGMLParserWrapperWrapper.h:
struct CityGMLParserWrapper;

@interface CityGMLParserWrapperWrapper: NSObject {
  struct CityGMLParserWrapper *parserWrapper;
}

- (id) init;
- (void) dealloc;
Note that we use a forward declaration of the first wrapper CityGMLParserWrapper and store a pointer to it in the second wrapper. In this way, we can keep the header as pure Objective-C and thus call it from Swift.
Next, we define its implementation in an Objective-C++ CityGMLParserWrapperWrapper.mm:
#import "CityGMLParserWrapperWrapper.h"
#import "CityGMLParser.hpp"

struct CityGMLParserWrapper {
  CityGMLParser *parser;
};

@implementation CityGMLParserWrapperWrapper

- (id) init {
  if (self = [super init]) {
    parserWrapper = new CityGMLParserWrapper();
    parserWrapper->parser = new CityGMLParser();
  } return self;
}

- (void) dealloc {
  delete parserWrapper->parser;
  delete parserWrapper;
}
Note that CityGMLParser is the C++ class, and that we need to create the two wrapper levels in init and delete them (C++ style) in the dealloc. This file can contain as much C++ as Objective-C++ allows.
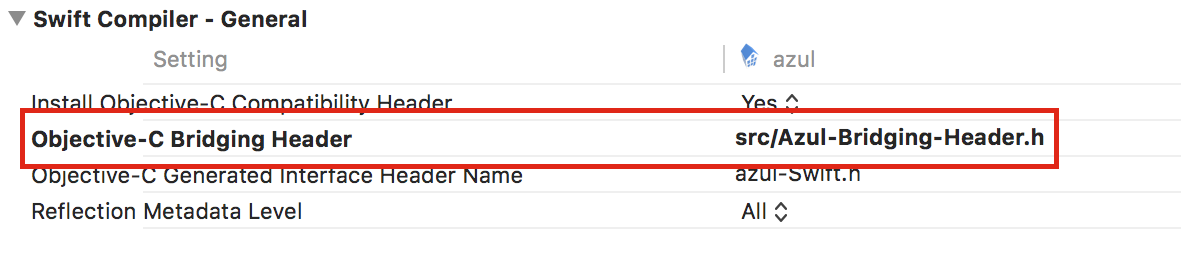
Finally, you likely need to add a bridging header that contains the import statement of your wrapper wrapper so that it can be used in Swift. If you use Xcode, this needs to be set in the Build Settings tab of the project settings. It simply needs to contain something like:
#import "CityGMLParserWrapperWrapper.h"Passing information between C++ and Swift code
Now, you will probably need to pass information between the C++ and the Swift code. This is relatively straightforward but is one of the areas where Swift offers little syntactic sugar.
If you’re using a POD data type, this is easiest. Just add appropriate getters and setters in your wrapper wrapper. These should make calls of the form return parserWrapper->parser->... or parserWrapper->parser->... = ....
So, let’s look directly at something a bit more difficult. In order to read an array or another memory-contiguous sequence of elements of known size.
A couple of arrays
In my C++ code, I have a couple of arrays that keep the bounding box surrounding my data:
float minCoordinates[3];
float maxCoordinates[3];
In order to access these, I have a couple of method declarations in my Objective-C wrapper:
- (float *) minCoordinates;
- (float *) maxCoordinates;
Note that we will return a pointer. This will be the address of the first element of each array. Then, the implementation of these methods is straightforward:
- (float *) minCoordinates {
  return parserWrapper->parser->minCoordinates;
}

- (float *) maxCoordinates {
  return parserWrapper->parser->maxCoordinates;
}
Iterators
Now let’s look at a more complex example. In azul, I needed a way to obtain much more complex data structures that were created in C++. These data structures consisted of std::lists of custom classes containing various attributes.
In such cases where you don’t know exactly where things might be stored2, the easiest way to transfer information is by defining custom iterators and to pass the information object by object and attribute by attribute.
So, in my C++ code I created various iterators such as this one:
std::list<CityGMLObject>::const_iterator currentObject;Then, in the wrapper wrapper I defined appropriate methods to initialise, advance and check if the iterator has ended:
- (void) initialiseObjectIterator;
- (void) advanceObjectIterator;
- (BOOL) objectIteratorEnded;
These can be implemented by simply calling the respective C++ iterator functions:
- (void) initialiseObjectIterator {
  parserWrapper->parser->currentObject = parserWrapper->parser->objects.begin();
}

- (void) advanceObjectIterator {
  ++parserWrapper->parser->currentObject;
}

- (BOOL) objectIteratorEnded {
  if (parserWrapper->parser->currentObject == parserWrapper->parser->objects.end()) {
    return true;
  } return false;
}
Strings
Now, let’s look at how to extract somewhat more complex C++ variables such as std::strings or other types that can be extracted as contiguous blocks of memory that don’t have a fixed length.
In the case of an std::string, the trick is to use its C representation as a const char * and to also receive a place to pass its length to the Swift code. A getter in the wrapper wrapper can then look like this:
- (const char *) currentObjectTypeWithLength: (unsigned long *)length;Note that we use an unsigned long since that is equivalent to a Swift UInt. The implementation would be like this:
- (const char *) currentObjectTypeWithLength: (unsigned long *)length {
  *length = parserWrapper->parser->currentObject->type.size();
  return parserWrapper->parser->currentObject->type.c_str();
}
Unlike in the other examples, the Swift code is not trivial and so I will explain it as well:
var objectTypeLength: UInt = 0
let firstElementOfObjectTypeBuffer = UnsafeRawPointer(cityGMLParser.currentObjectType(withLength: &objectTypeLength))
let objectTypeData = Data(bytes: firstElementOfObjectTypeBuffer!, count: Int(objectTypeLength)*MemoryLayout<Int8>.size)
objects.last!.type = String(data: objectTypeData, encoding: .utf8)!
There are a few things to see here. We first define the variable where we will store the string length objectTypeLength and pass it as a pointer using &objectTypeLength. The return value is immediately cast to an UnsafeRawPointer.
Then, we use the Swift Data to store the contents of the buffer at the location of the returned pointer. And finally, we can create a Swift String using the buffer data.