A 1.5 column layout in LaTeX
Apr 17, 2016
Early in my thesis writing process, I decided that I wanted to have a ‘1.5 column’ layout. That is, I wanted to have a layout with wide outer margins where I could place small figures and sidenotes1. Big figures could still go inside the text block, while even bigger figures could use both the text block and the margins. It is similar to the layout that is used in the BCKO Computational Geometry book and some journals like PLOS ONE.
My reasoning for this was quite simple: I like to use plenty of simple figures to explain ideas, but they result in a lot of wasted space. A narrow text block is more pleasant to read, but it again results in a lot of wasted space. Finally, I love footnotes, but they require the reader to go to the bottom of the page in order to read them and then to find back their place in the text. All of these issues can be solved by a 1.5 column layout with marginal notes instead of footnotes. But how does one make such a layout in LaTeX?
Paper size and page construction
The B5 paper size used in most theses in the Netherlands is very nice, but it is a little too narrow for this type of layout. So, among the paper sizes available from Lulu.com, I decided to go for something more squarish: crown quarto, a British paper format.
Then, I proceeded my read a bit about page construction, which ended up taking a lot of time without giving much insight on how to handle this type of layout. After playing a bit with different ratios, I decided to follow a few typographic rules: the height of the text block should be the same as the width of the page, and the ratio between the inner/top and outer/bottom margins would the golden ratio2. However, after receiving a printed (and bound) proof, I discovered that the inner margins were too small for comfortable reading. So I made them equal to the outer margins in order to account for the space used for binding and cause less strain on the book. After playing with different values, I arbitrarily set the width of the space for marginal notes at 4 cm and the space between the marginal notes and the text block at 0.4 cm. All of this was done using the geometry package in the preamble as:
\usepackage[includemp,
            paperwidth=18.90cm,
            paperheight=24.58cm,
            top=2.170cm,
            bottom=3.510cm,
            inner=2.1835cm,
            outer=2.1835cm,
            marginparwidth=4cm,
            marginparsep=0.4cm]{geometry}
However, I should note that there are certain chapters in which layout doesn’t make much sense, such as the bibliography. Non-centred title pages also look sloppy. So, in order to temporarily set a different layout without space for marginal notes for certain chapters, I used:
\newgeometry{top=2.170cm,
            bottom=3.510cm,
            inner=2.1835cm,
            outer=2.1835cm,
            ignoremp}
And after such chapters:
\restoregeometry%Page head and foot
In my opinion, the key to making this kind of layout seem deliberate rather than accidental is to make sure your page head (and foot) extends up to the space used by the marginal notes. For this, I defined a custom length equal to the width of the text block, marginal notes and the space between them as:
\newlength{\overflowingheadlen}
\setlength{\overflowingheadlen}{\linewidth}
\addtolength{\overflowingheadlen}{\marginparsep}
\addtolength{\overflowingheadlen}{\marginparwidth}
Then, since I used koma-script, I used the package scrlayer-scrpage to create page heads and foots that extended to this length using invisible boxes:
\renewpagestyle{scrheadings}{
  {\hspace{-\marginparwidth}\hspace{-\marginparsep}\makebox[\overflowingheadlen][l]{\makebox[2em][r]{\thepage}\quad\rule{1pt}{100pt}\quad{}\leftmark}}%
  {\makebox[\overflowingheadlen][r]{\rightmark\quad\rule{1pt}{100pt}\quad\makebox[2em][l]{\thepage}}}%
  {}
}{
  {}%
  {}%
  {}
}
\renewpagestyle{plain.scrheadings}{
  {}%
  {}%
  {}
}{
  {\thepage}%
  {\makebox[\overflowingheadlen][r]{\thepage}}%
  {}
}
Just as before, for the chapters without space for the marginal notes, I had to set up different heads:
\cleardoublepage%
\renewpagestyle{scrheadings}{
  {\makebox[2em][r]{\thepage}\quad\rule{1pt}{100pt}\quad\leftmark}%
  {\hfill\rightmark\quad\rule{1pt}{100pt}\quad\makebox[2em][l]{\thepage}}%
  {}
}{
  {}%
  {}%
  {}
}
\renewpagestyle{plain.scrheadings}{
  {}%
  {}%
  {}
}{
  {\thepage}%
  {\hfill\thepage}%
  {}
}
Figures and tables in margins
As you might know, LaTeX provides \marginpar, a simple command to add marginal notes. While most people use this only for text, it is possible to add images inside the marginpar environment using \includegraphics. However, you cannot add floating environments such as figure and table inside a marginpar. The solution here is to use the caption package, which allows you to use \captionsetup in order to specify that a certain marginpar is actually a figure (or table). As an aside, if you pass the option hypcap=true to caption, it will load the hypcap package so that hyperref links go to the top of the figure/table rather than to its caption.
A marginal figure can thus be set up as:
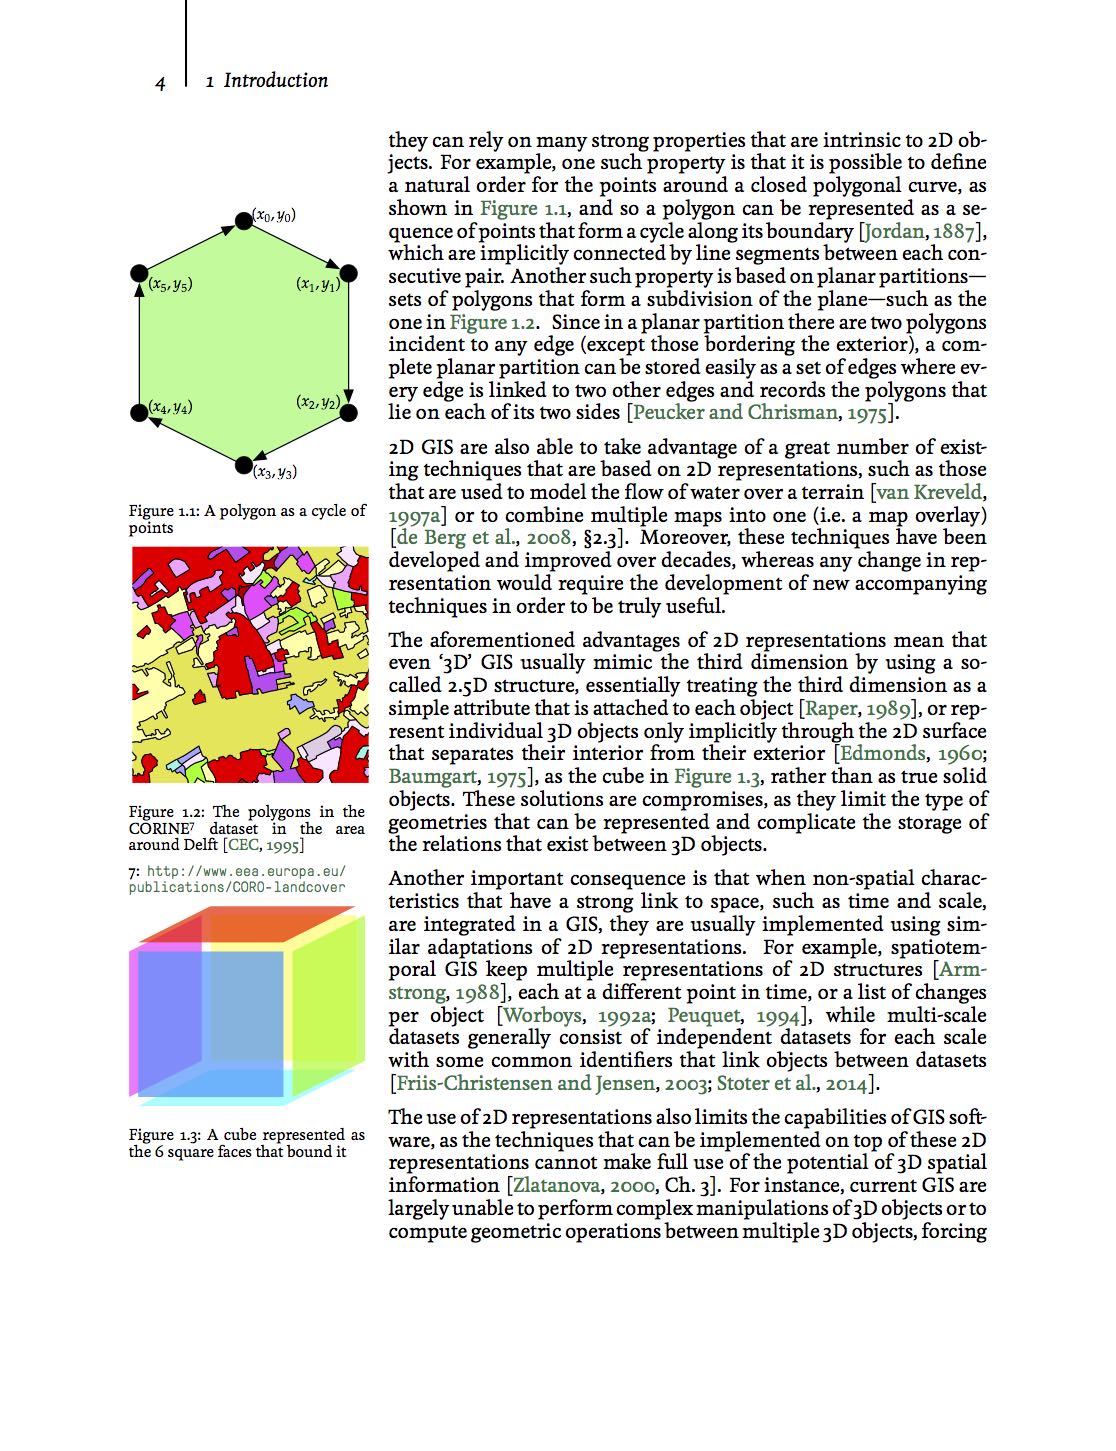
\marginpar{
\captionsetup{type=figure}
\includegraphics[width=\marginparwidth]{figs/brep}
\caption{A cube represented as the 6 square faces that bound it}
\label{fig:brep}
}
Floating marginal environments
A disadvantage of the marginpar command is that it puts notes and figures right beside the text where the command is called. While this is fine when you don’t have too many things on the margins, things can overflow to the page foot and even outside the page when you have too many of them.
This is very easy to solve, as the package marginfix makes the environments in the margins float. Everything will be placed as close as possible to where you declare it, but when necessary, things will be moved up or down (or to the next page) and never be placed outside the space for marginal notes.
For big documents, it’s also a good idea to allow for more unprocessed floats such that you don’t get LaTeX errors if too many things remain unplaced:
\extrafloats{100}Footnotes as sidenotes
This is simple. In order to convert all footnotes into sidenotes, I used the snotez package as:
\usepackage[footnote]{snotez}
\setsidenotes{text-mark-format=\textsuperscript{\normalfont#1},
              note-mark-format=#1:,
              note-mark-sep=\enskip}
Figures and tables in the text block
With the aforementioned setup, you can still use the usual figure and table environments to put bigger figures inside the text block. However, I decided to do some extra customisation to use the marginal space for the captions of such figures and tables using the floatrow package:
\floatsetup[figure]{margins=hangoutside,
                    facing=yes,
                    capposition=beside,
                    capbesideposition={center,outside},
                    floatwidth=\textwidth}
\floatsetup[table]{margins=hangoutside,
                   facing=yes,
                   capposition=beside,
                   capbesideposition={center,outside},
                   floatwidth=\textwidth}
Big figures and tables using text block and margins
Finally, I set up environments for big figures and tables that use all the width of the text block, marginal note space and the separation in between them. This is also easy using the floatrow package:
\floatsetup[widefigure]{margins=hangoutside,
facing=yes,
capposition=bottom}
\floatsetup[widetable]{margins=hangoutside,
facing=yes,
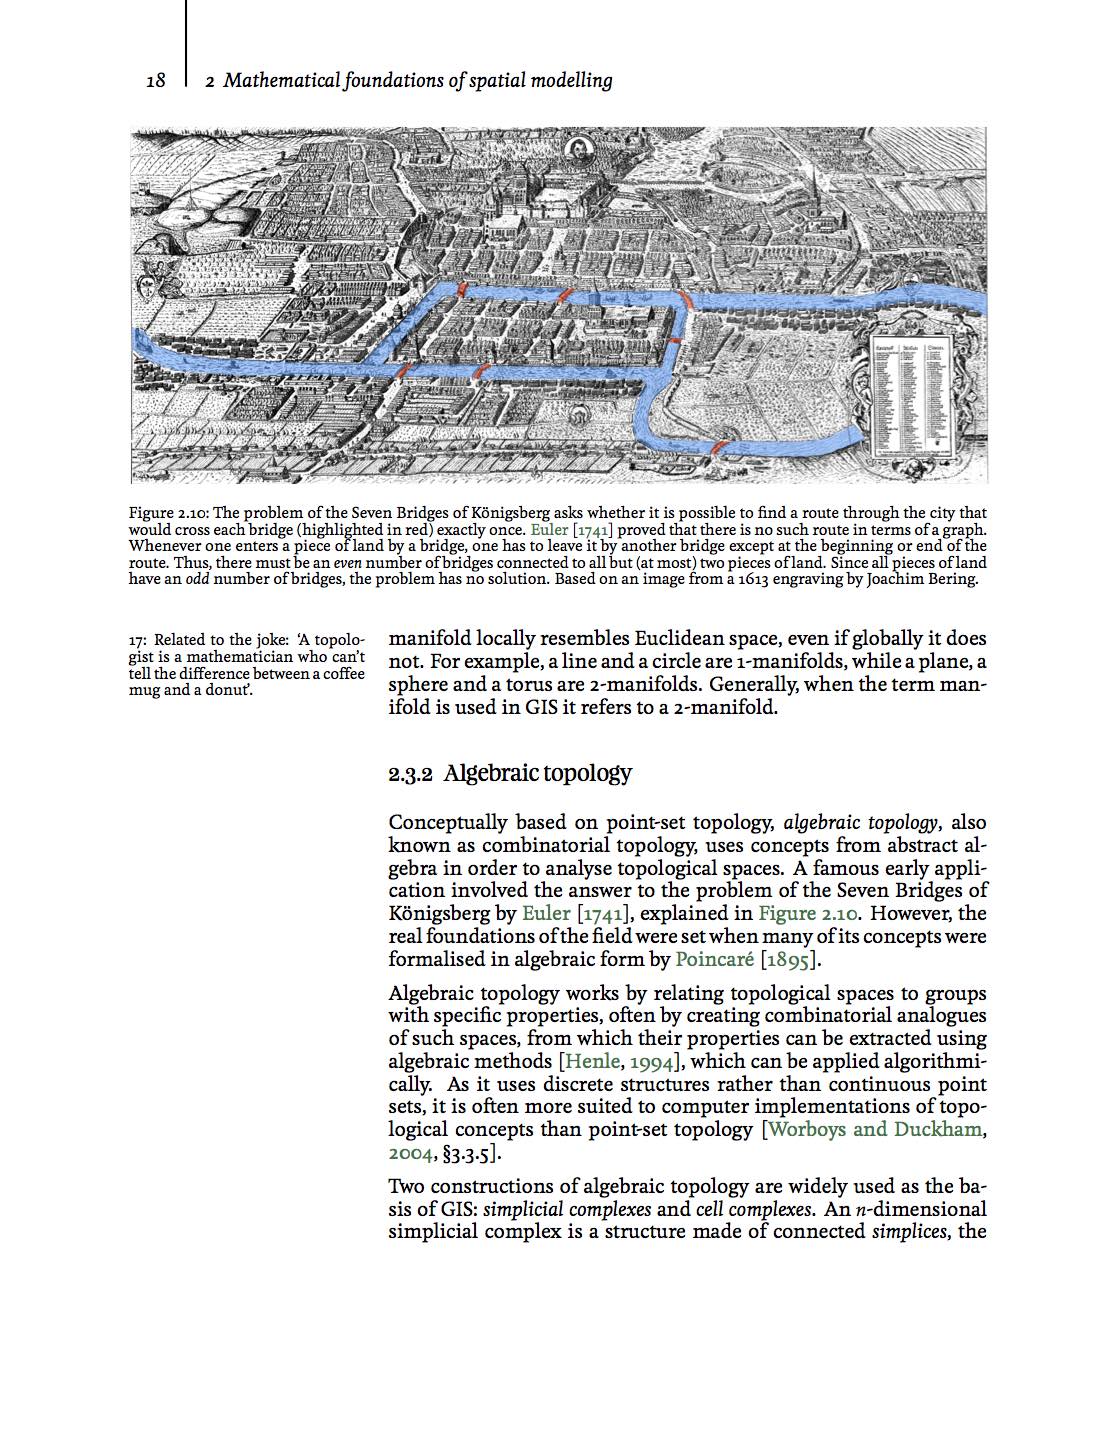
capposition=bottom}Such figures and tables can be created using the figure* and table* environments. For instance, the figure in the example above is created as:
\begin{figure*}[tbp]
\centering
\includegraphics[width=\linewidth]{figs/konigsberg}
\caption[The Seven Bridges of K\"onigsberg]{The problem ...}
\label{fig:konigsberg}
\end{figure*}
Extending other things into the marginal space
You might also want to allow other things to extend into the marginal space. For instance, I had a section with plenty of equations that could be displayed much more compactly if I used the marginal space. I had only a few places where this was necessary, so I didn’t bother to make a complex command that figured out if the outer margins were left or right of the text block.
So, with the help of minipage and out previously defined \overflowingheadlen, in order to extend something to the outer margin when it is on the left of the text block, I used:
\blockmargin%
\hspace{-\marginparwidth}\hspace{-\marginparsep}\makebox[\overflowingheadlen][l]{
\begin{minipage}{\overflowingheadlen}
...
\end{minipage}
}
\unblockmargin%
Note that \blockmargin and \unblockmargin are necessary in order to avoid other floating environments clashing with the minipage.
Extending things towards the outer margin when it is on the right of the text block is even simpler. Just remove the negative \hspaces:
\blockmargin%
\makebox[\overflowingheadlen][l]{
\begin{minipage}{\overflowingheadlen}
...
\end{minipage}
}
\unblockmargin%
Caveats
This setup is by no means perfect. My main annoyance is that if you combine figures in the margins with figures in the text block, they might not be placed in the right order, which requires some manual tweaking to solve. However, it still works pretty well, even with subfigures.
One other aspect to consider with this layout is sloppy spacing. LaTeX really dislikes big or uneven inter-word spacing. This is usually fine when the text block is sufficiently wide, as there is enough flexibility to have even spacing (as long as you help it define proper hyphenation, e.g. using babel with the correct language settings). However, this can wreak havoc with narrower text blocks, including our side notes. My solution to this is to use sloppy spacing with the command \sloppy3. In order to help break urls, I also use the breaklinks=true option in hyperref and the hyphens option in url as:
\PassOptionsToPackage{hyphens}{url}\usepackage[
            breaklinks=true]{hyperref}
So, if you found this useful and have any ideas on how to improve this, please let me know.